Getting started
Welcome! In this guide you will learn the basics of Unilist and how to use it.
Unilist is a web application. There is no iOS or Android application at the moment,
but at the same time there are some pros: no need to download, no need to install, no need to update.
Just use a modern web browser and any device: smartphone, tablet, notebook or laptop.
Sign up and sign in
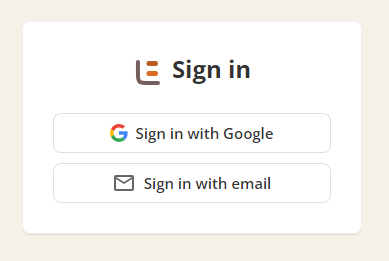
To sign in, visit https://unilist.app and click Sign
in button.
There are two options: with Google and with email.
If you have a Google account, you can easily sign in by clicking on the Sign In with Google
button.
If you previously registered with Unilist using an email address which is the same as your Google
account, the Google account will be added to your existing Unilist account
so that you will be able to login using either option (Google or email/password).
Email and password
If you don't have an account and wish to sign up using your email address, click on the Sign
up button.
Then enter your email and press Continue button. You will receive a confirmation link via email.
Open the link and enter a password.
Your password must contain:
- minimum of 6 characters;
- an uppercase character;
- a lowercase character;
- a number;
- a special character.
After that your account will be confirmed and you can log in to the app.
How to install Unilist
You can use Unilist in your browser or add a shortcut to your desktop / device's home screen.
Adding the shortcut from Safari browser:
- Open the unilist.app.
- Tap the Share icon (the square with an arrow pointing upward) at the bottom of the screen.
- Scroll down to the list of actions and tap Add to Home Screen. (If you don't see the action,
scroll to the bottom and tap Edit Actions, then tap Add next to the Add to Home Screen action.
After that, you'll be able to select it from the Share Sheet.)
- Type a name and tap Add in the top-right corner of the screen.
- A shortcut to the app will now appear on your device's home screen.
Main menu
The main menu is in the center of the Unilist header. It has three items: Home, Notes and Search.
The main menu is always visible within the app,
so you have quick access to your shortcuts, tasks, search and recently visited notes.
You can also click the logo to open settings, shared notes or to sign out from the app.
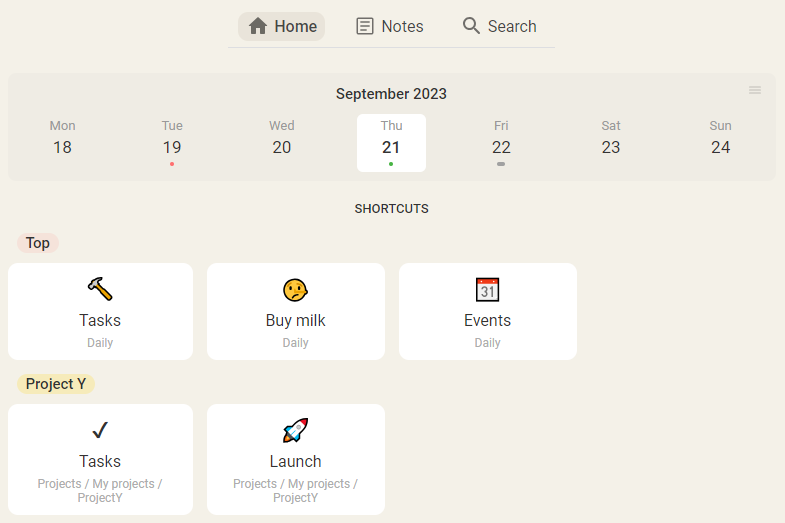
Home page
When you log in to Unilist or visit https://unilist.app
while you're logged in, you are directed to the Home page.
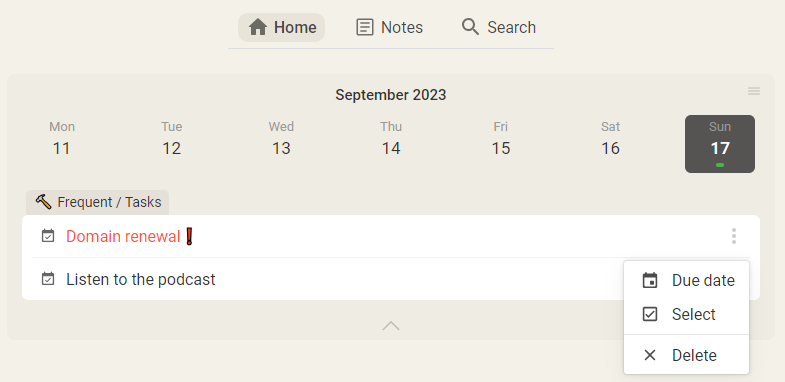
There are two sections on the Home page: tasks and shortcuts.
In the tasks section you can view tasks for the current day and for the current week.
Tasks allow you to not forget important tasks or deadlines. For mor information
see the Tasks section.
Shortucts let you quickly open the most frequently used or important notes and folders.
See the Shortcuts section to learn how to create and remove shortcuts.
Folders
Creating folders
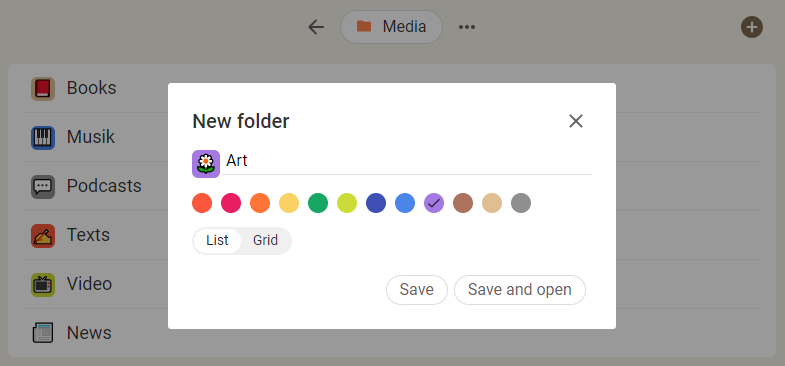
To create a new 'top level' folder open the Home page. Click + button.
In the appeared window enter a folder name, choose a color, icon, layout and click
Save or Save and open button.
Why use icons and colors:
- they make folders look more appealing and user-friendly;
- it's easier to visually identify and organize folders;
- you can quickly locate the folder you need by recognizing its icon or color.
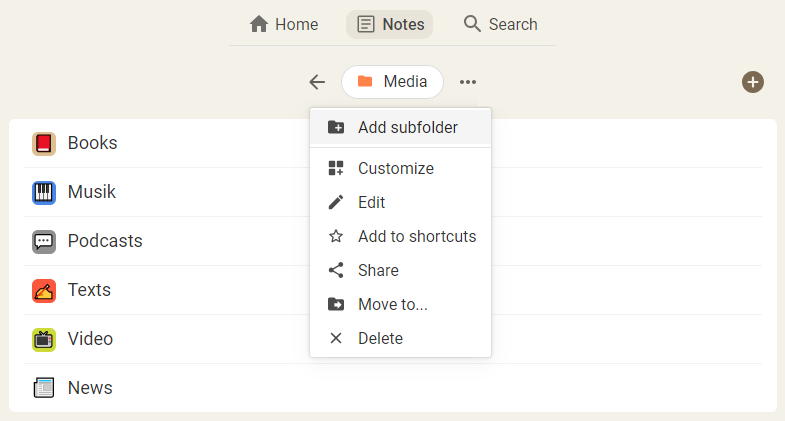
To create a subfolder open a folder, click ••• (Folder menu) button and in
the appeared popup menu click Add subfolder.
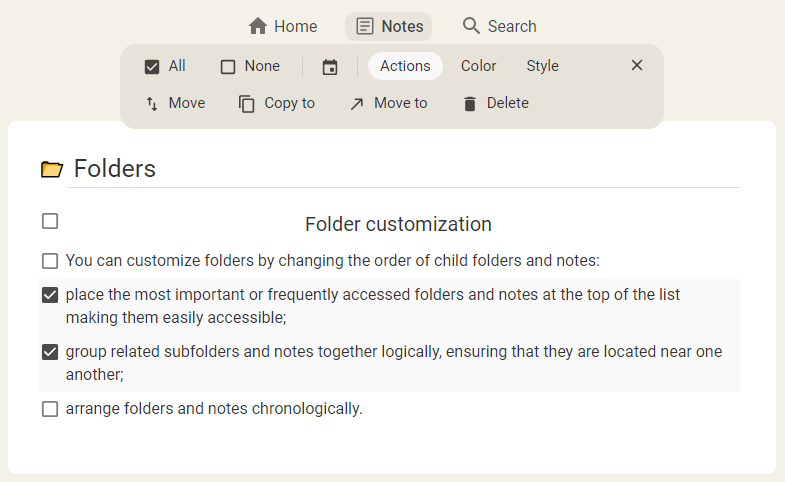
Folder customization
You can customize folders by changing the order of child folders and notes:
- place the most important or frequently accessed folders and notes at the top of the list
making them easily accessible;
- group related subfolders and notes together logically, ensuring that they are located near one another;
- arrange folders and notes chronologically.
To change the order, click ••• (Folder menu) button and in the appeared popup menu click Customize.
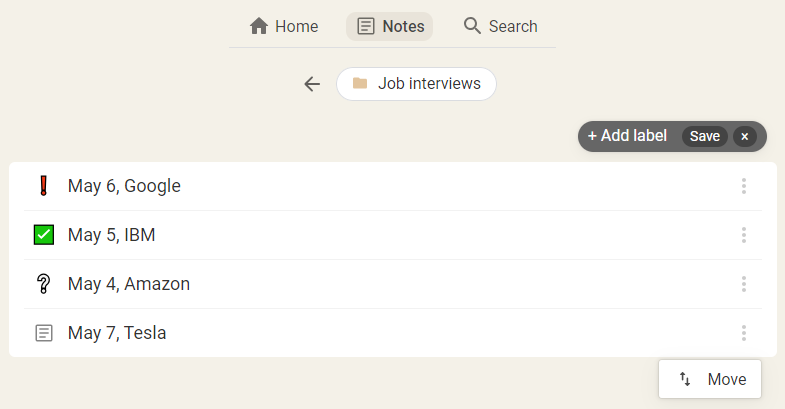
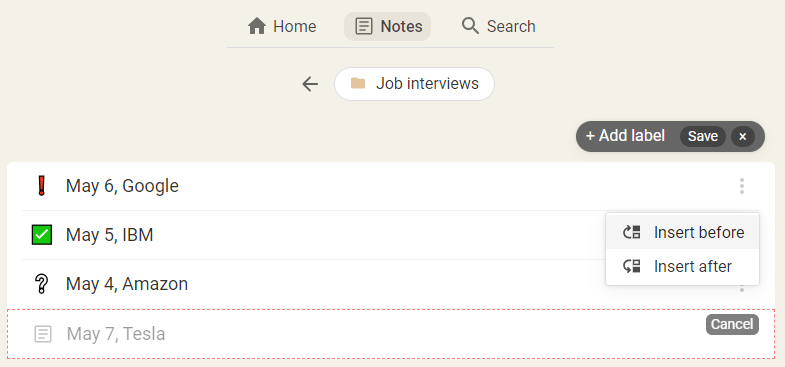
Click the three dots button near the folder or note you want to move and
choose Move from the dropdown. Near the item, before or after which you want
to insert the selected item, click the three dots button and
choose Insert before or Insert after from the dropdown.
Also you can group related subfolders and notes by using labels. Labels allow you to group child notes and
folders by category or topic. In addition labels allow you to reduce number of subfolder levels,
that simplifies navigation through folders and notes.
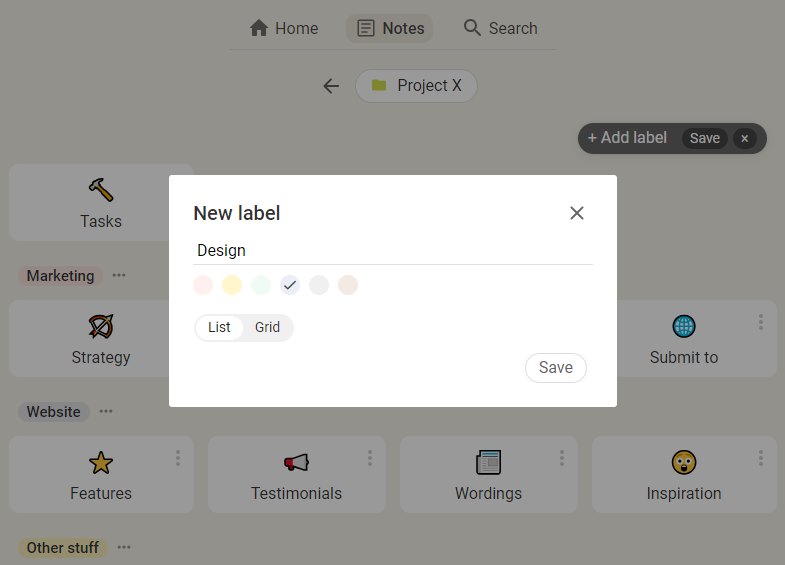
To create a label click +Add label button. In the appeared window enter a label name,
choose a color and layout. Click Save.
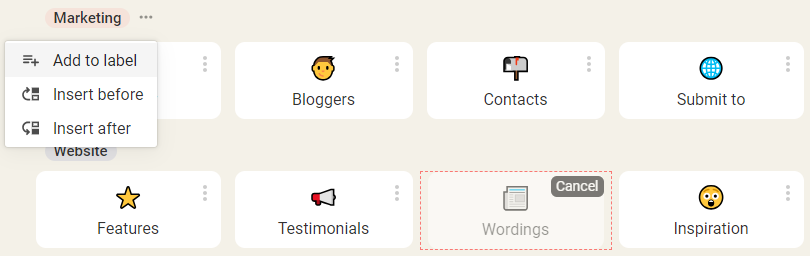
After creating a label you can move notes and folders under the label.
Click the three dots button near the folder or note you want to move and
choose Move from the dropdown. Near the target label click the three dots button and
choose Add to label.
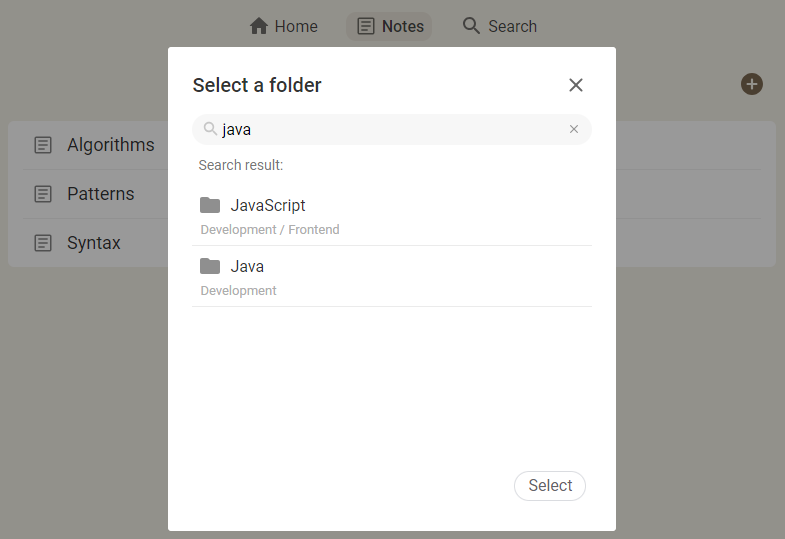
Moving folders
To move a folder into another, click ••• (Folder menu) button and in the appeared popup menu click Move to.
In the appeared window select a destination folder and click Select button.
It's possible to navigate to the destination folder manually or just use the search input.
Notes
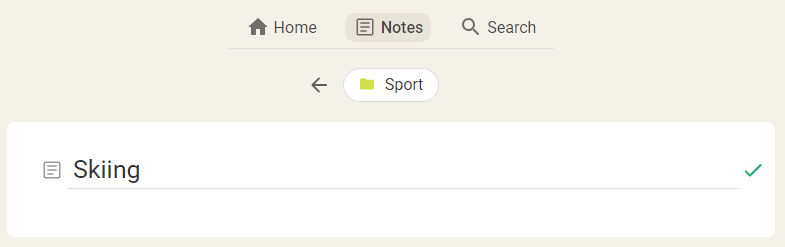
Creating notes
To create a note, open a folder and click + button. Enter a title and click the green check mark button to save the note.
Note icon
It's possible to use an emoji instead of standard note icon. Emojis make notes memorable and easy to find.
Click the icon near the note title. In appeared window choose
an emoji. You can use filter. To reset selected emoji to the standard icon, click Use default.
Note details and settings
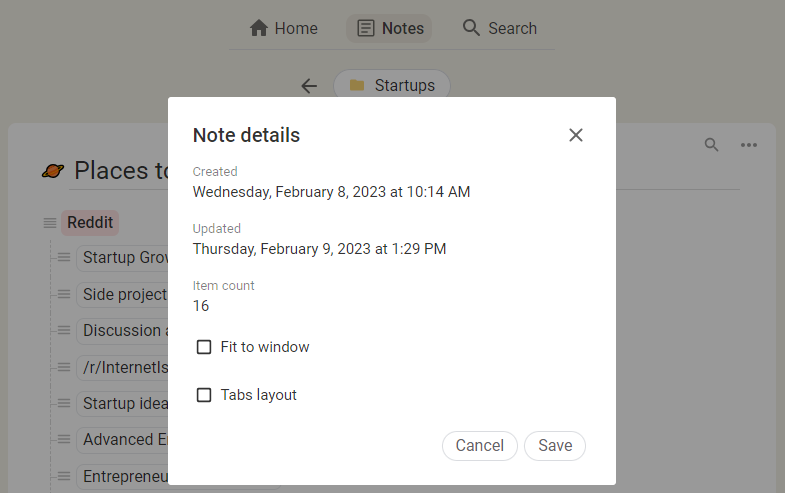
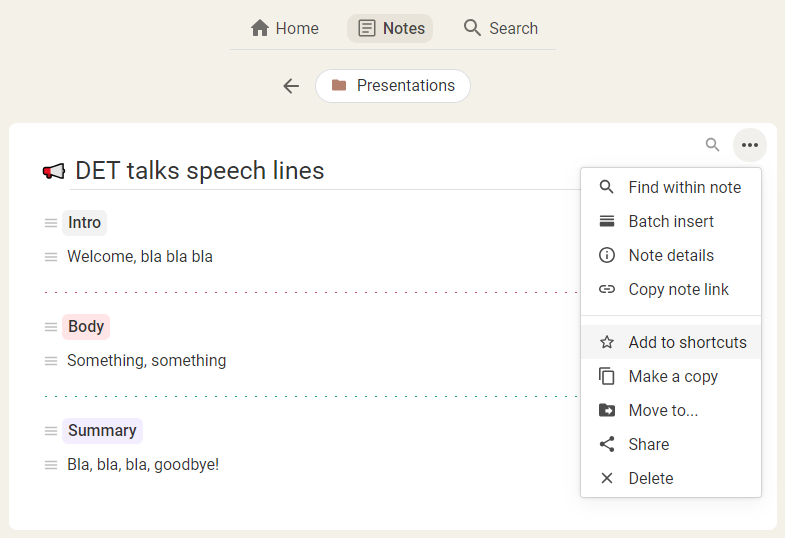
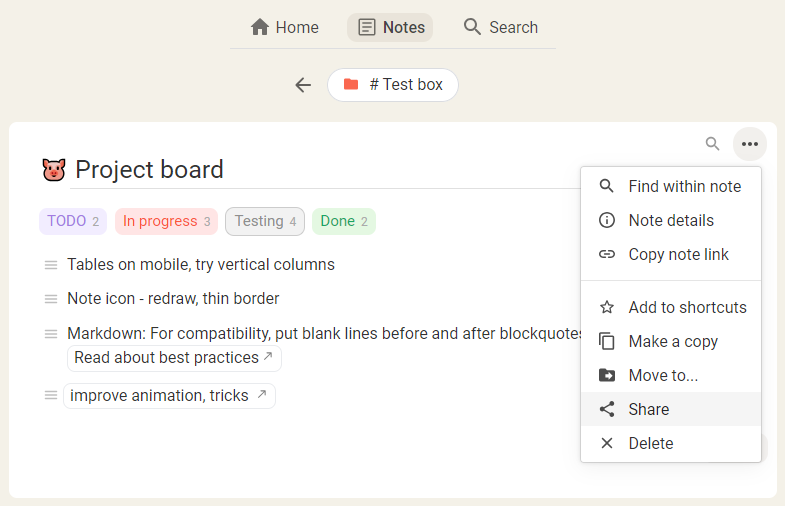
To open note details, click ••• (Note menu) button at the top right of the note, then click Note details.
Note details contain various information about the note, including the date it was created,
the date it was last updated, and the item count.
Settings:
Fit to window - lets you widen the content of your note. This setting is useful for notes with tables.
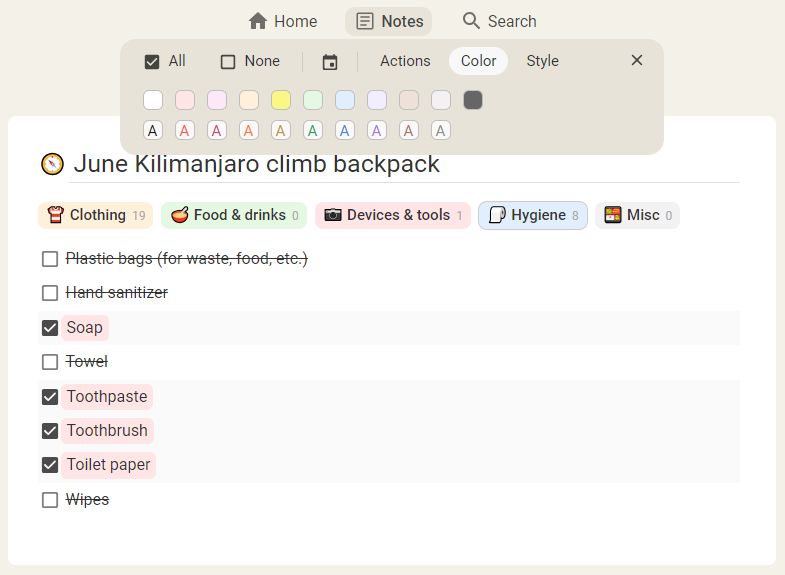
Tabs layout - Tabs enable quick access to different categories of items within a note. Instead of scrolling through a long list,
you can simply switch to the relevant tab to find the information you need. You can use tabs as Kanban boards.
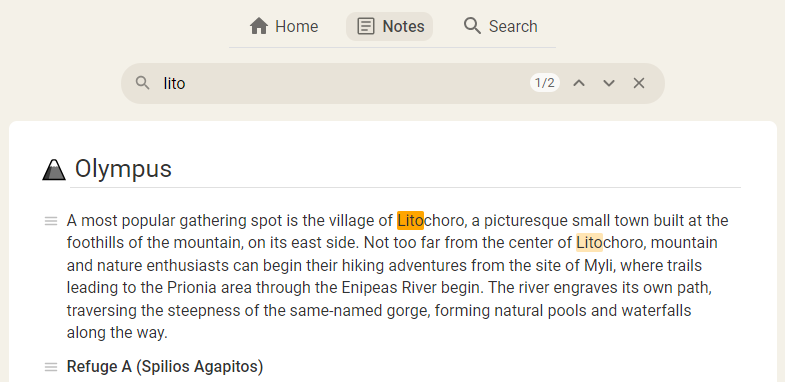
Search within note
To search specifically within the note you currently have open, click the magnifier icon at the top right of the note.
In the appeared search bar type in the search term. Matches will be highlighted with orange.
Click on the up and down arrows to scroll through the search results.
Moving note
To move a note into another folder, click ••• (Note menu) button at the top right of the note
and in the appeared popup menu click Move to.
In the appeared window select a destination folder and click Select button.
It's possible to navigate to the destination folder manually or just use the search input.
Items
Item is the base unit in Unilist. To create an item, click +Add button.
Item style
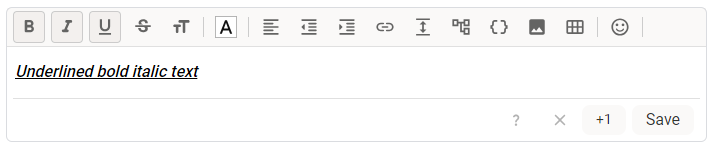
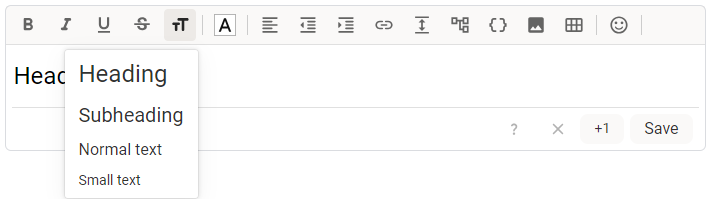
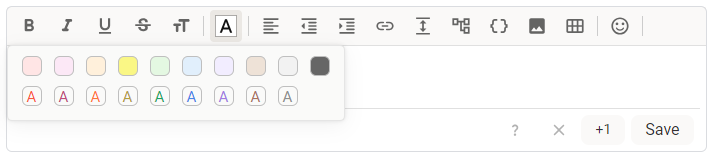
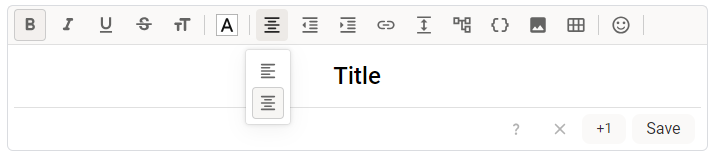
Unilist provides simple styling of items. You can choose the following options: Bold, Italic, Underline and Strikethrough.
You can also change font size
text and background color
and text alignment.
Item kinds
You can use various kinds of items:
link, divider, code, image, tabs, sublist, table. The default kind is simple text.
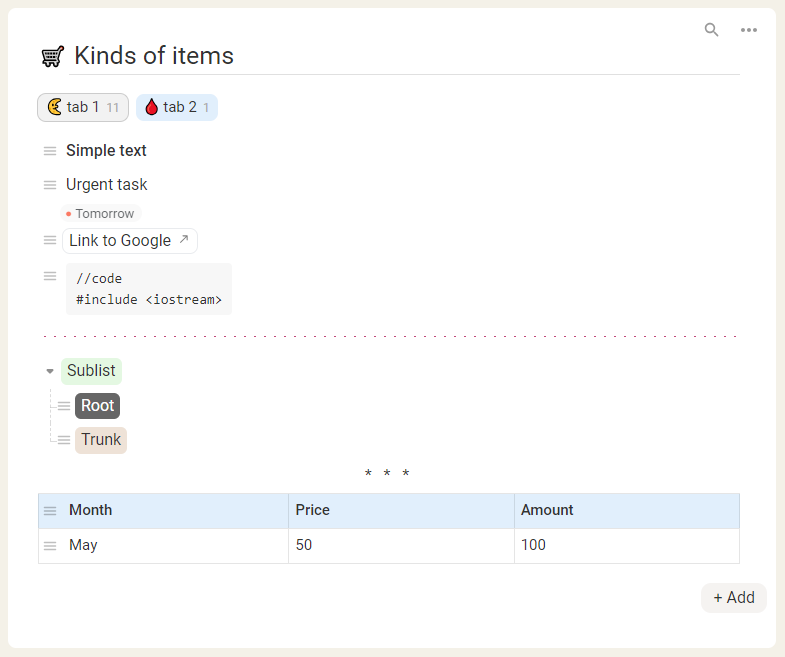
Here is an example note with different item kinds:
In this section you will learn how to create a link, divider, code
and image.
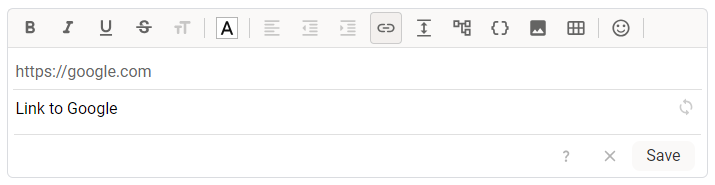
Link
To create a Link, add a new item and then click Link icon in the item editor toolbar. Then enter
the link(URL) and text, describing the link.
You can also load the text from the website by clicking the 'Load' button.
Please, note that it's not possible to change the link font size, alignment and indentation.
Divider
To create new Divider add a new item and click Divider icon in the item editor toolbar.
Then choose one of the options:
Code
To create new Code item add a new item and click Code icon in the item editor toolbar.
Then enter your code. Here is an example:
Image
It's possible to insert images only from external sources. Later you will be able to upload them.
To insert an image, add a new item and click Image icon in the item editor toolbar.
Then enter a link(URL) to your image.
Tabs
Tabs enable quick access to different categories of items within a note.
Instead of scrolling through a long list, you can simply switch to the relevant tab to find the information you need.
Tabs help you reduce clutter.
Additionally, you can use tabs as a Kanban board to manage your own projects.
Every tab in Unilist is a Sublist. Learn how to create sublists in the next section.
To create tabs, follow these steps: create sublists, open the note details window and enable 'Tabs layout'.
Now, your sublists will be turned into tabs.
You can switch back to sublists by disabling the 'Tabs layout'.
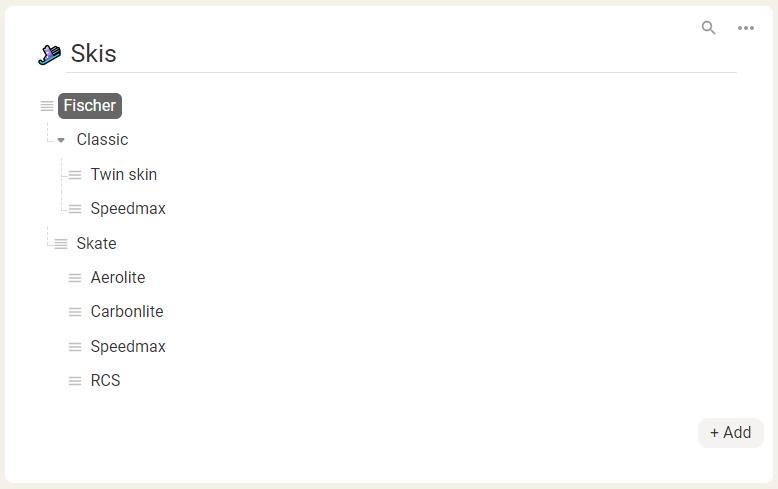
Sublists
Sublists allow you to organize your notes more effectively.
You can group related information under a collapsible item, making
it easier to find and navigate through your note.
Also, when you have a long list, sublists help you reduce visual clutter.
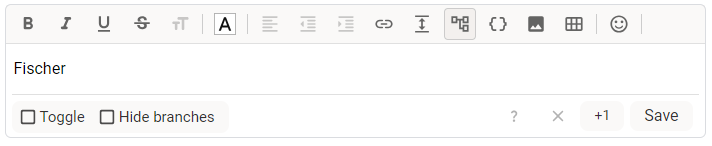
To create new Sublist add a new item and click Sublist icon in the item editor toolbar.
Sublist settings:
- Toggle - make the sublist toggleable, you will be able to expand and collapse it;
- Hide brunches - if you don't need brunches, you can hide them. For example, in a long article.
Here is an example of sublists with different settings:
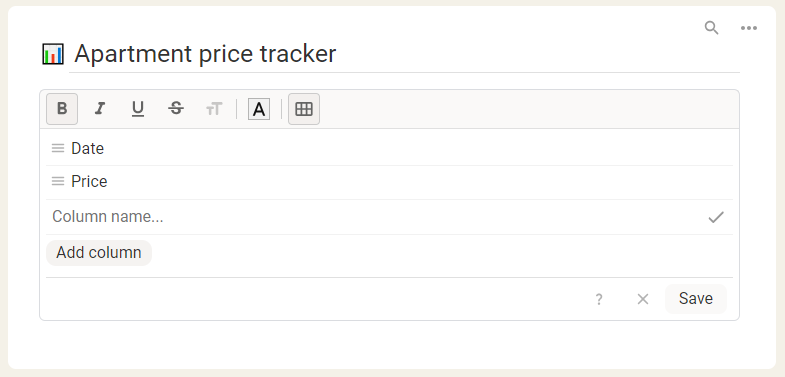
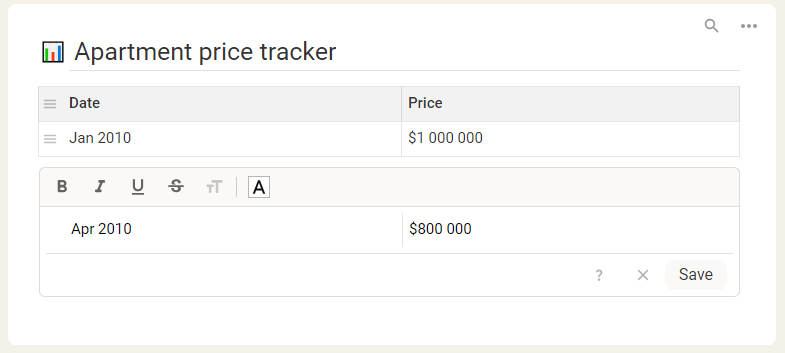
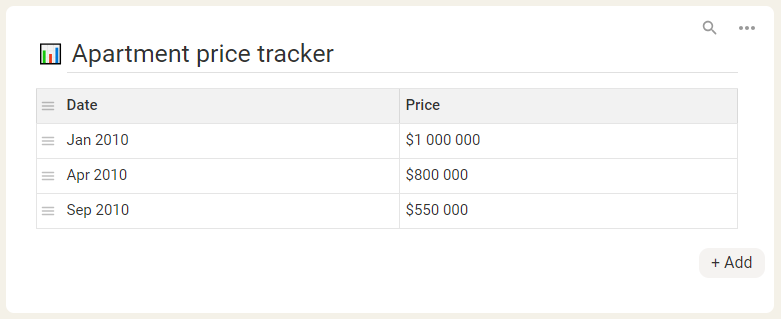
Tables
You can create simple tables that allow you to organize and present structured data.
To create a table, add a new item and click Table icon in the item editor toolbar. Create
columns by clicking the button Add column. After entering the column name click 'V' button
or 'Enter' button on your keyboard to save the column.
Now you can create table rows. Click +Add button and enter the data you need.
Here is an example of simple table:
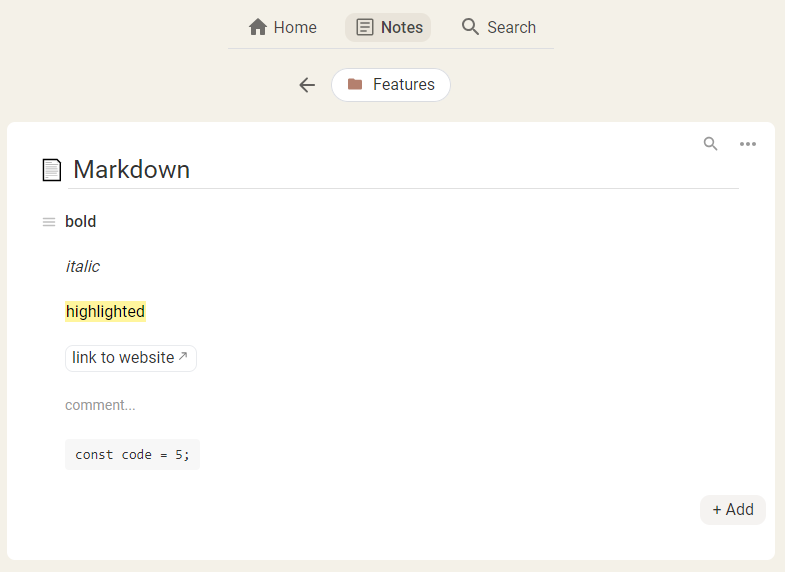
Markdown
Use Markdown if you need to format a piece of text, rather than the entire item, or insert a link within the text.
Here is the list of available formatting options:
| **bold** | bold |
| *italic* | italic |
| ::highlighted:: | highlighted |
| [link to website](https://url.com) | link to website |
| >> comment... | |
~~~
const a = 5;
~~~ | const a = 5; |
Bulk operations
You can perform different operations on multiple items at once.
To do that, open an item menu and click Select.
The item will be selected and the actions toolbar will appear.
Move - move selected items within the note;
Copy to - copy selected items to another note;
Move to - move selected items into another note;
Delete - delete selected items.
You can also change the due date, color or style of the selected items.
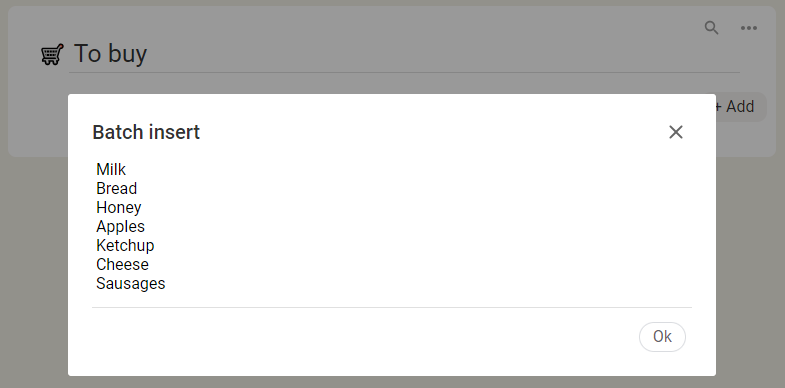
Batch insert
You can insert multiple items at once. Open a note menu, click 'Batch insert'. Enter or paste multiple lines of text.
One line = one item.
Shortcuts
To have quick access to the frequently used or important notes you can create shortcuts.
Open a note, open the note menu and click Add to shortcuts.
Also you can create shortcuts for folders. Open a folder, open the folder menu and click Add to shortcuts.
To remove a note or folder from shortcuts, open its menu and click Remove from shortcuts.
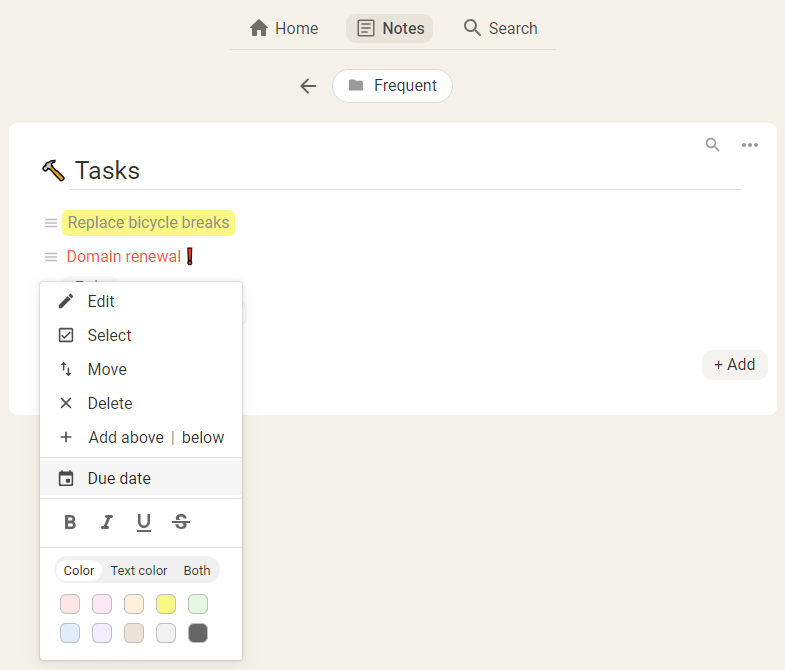
Tasks
To create a task, open an item menu, click Due date and select a date.
After that you will
see the new task in the tasks section of the Home page.
Every task has its menu:
Due date - change due date or clear due date.
When you clear the due date, the item remains in the note.
Select - allows you to select multiple tasks and update/delete them at once;
Delete - deletes the task and the item from note.
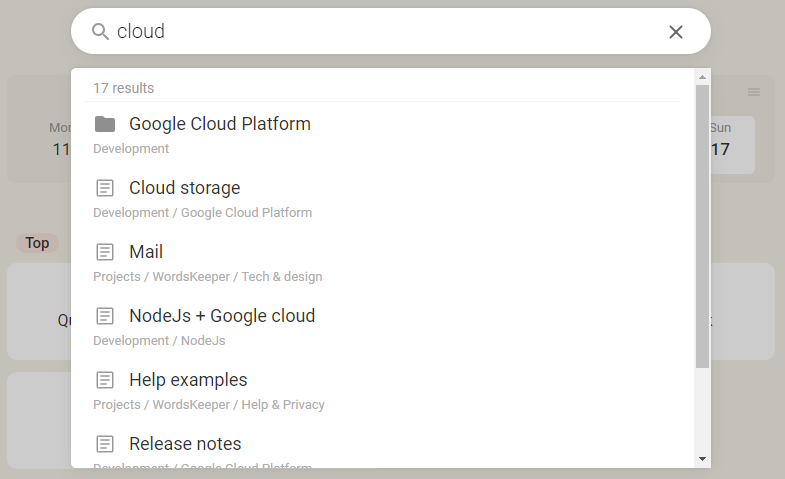
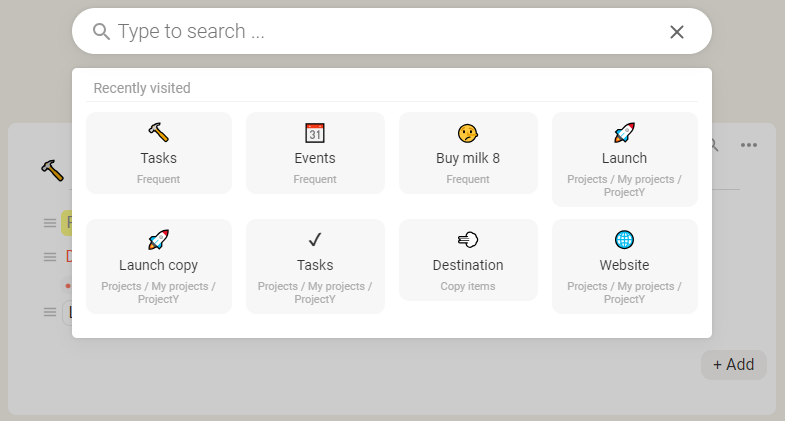
Search
When you want to find something — whether it's a folder, note, or some text in a note —
click the Search button at the top of the window and type your search term.
You will also see your recently visited notes, so you can click to open one of them right away.
Recently visited notes
Recently visited notes are always at your fingertips. Simply click the Search button at the top
and then click on any note to open it.
Share
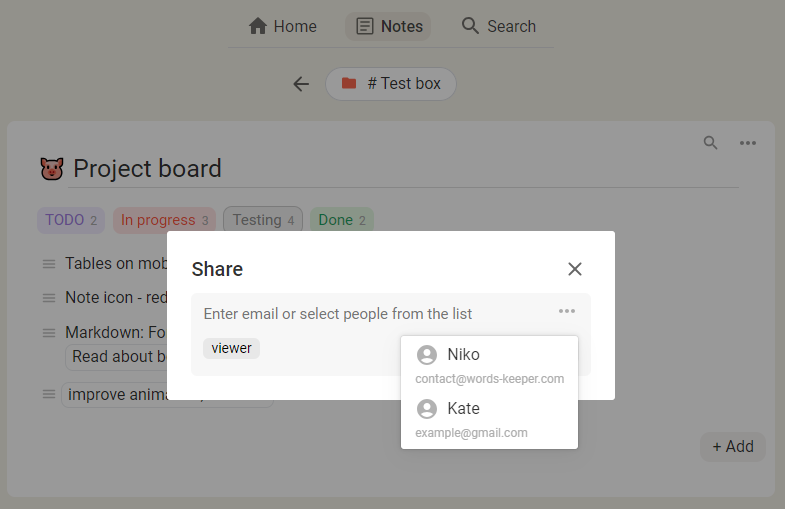
You can share notes or folders with other people. To share a note or folder open its menu and click Share.
In the appeared window enter an email address or select a user from the list (if you already
shared notes with that user). Choose a role from the dropdown and click Share.
User roles:
Viewer - can only read shared notes;
Editor - can read and edit.
If you've already shared notes with the particular user, he will get access immediately. Otherwise
he will receive the invitation email and must confirm the invitation.
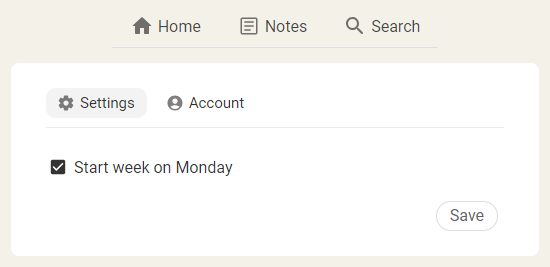
Settings
To open app settings, click the logo at the top left corner of the window and choose Settings from the dropdown.
The Settings page allows you to manage your basic preferences.
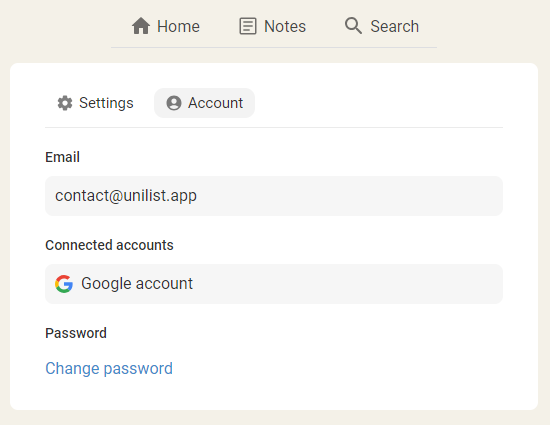
In the Account tab you can view your account information and change your password.